R.Hulcher nous explique ci-dessous comment débrider un moteur de RSV, sachant que la base moteur du Falco est identique.
De-destricts the US version Aprilia RSV mille (RSV 1000) -- USA Model --
("Aprilia mille performance Mod") – R.Hulcher 11/22/99
If you have purchased your US model year 2000 year Aprilia RSV mille – it is only 98 bhp from the factory. You can modify your mille to 128 bhp in about 1.5 hour with SIMPLE HAND TOOLS (see below). There is a posting on www.apriliaworld.com/FAQ/DeRestrict/derestricted.html -- but it was hard to see any art work. I took photos as I did the work.
You MUST DO ALL 3 MODS, or there is some risk to your motorcycle!
I make no warrantees of fitness or merchantability, and the user assumes all risks – both personal injury and property damage liability.
The basic steps shown below are:
TOOLS:
(1) Remove the Air Restrictor:
Remove the Front Tank bolts (8mm) and prop up the tank. The tank prop is under the solo cover/passenger seat See the owners Use and Maintenance manual page 94 "Lifting the Fuel Tank" for associated Warnings and Cautions.
Remove the air cleaner cover by removing (partially) the seven (7) 7mm hex head screws. Then remove the air cleaner element. See the owners Use and Maintenance manual page 72 "Air Cleaner" for associated Warnings and Cautions.
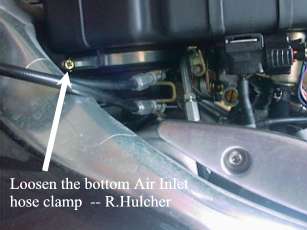
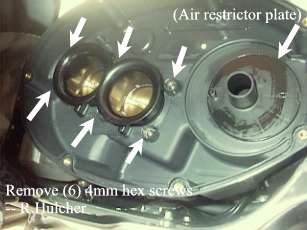
Loosen the hose clamp fixing the air inlet to the bottom of the air cleaner box. The six (6) 4mm hex head screws holding the air cleaner box to the throttle bodies are captive fasteners. Removal is not necessary, just loosen them until the head is just below the plastic retainers. If you prefer to remove them, be careful that they do not enter the to air stacks!.
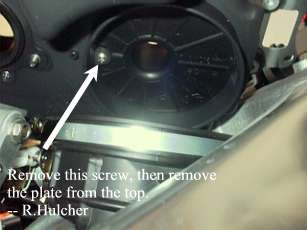
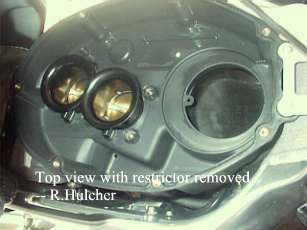
Tilt the air cleaner box to the left pulling it off of the air inlet duct (where the hose clamp is) to reveal the bottom of the air cleaner box. Remove the screw holding in the entire restrictor plate, and remove the plate from the top side of the air box.
Install the air box on the air intake hose, and tighten the hose clamp. Install the (6) 4mm hex screws fastening the air box to the throttle bodies.
Install the air cleaner element, and re-install the top cover (7) 7mm bolts.
(3) Electronic Contol Unit (ECU) mod:
Remove the rider saddle by removing the two (2) 8mm bolts under the rear sides of the seat. See owners Use and Maintenance manual page 94 for cautions. Remove the rubber cover from the ECU. Locate the small electrical connector (it is on the riders left side of the ECU.)

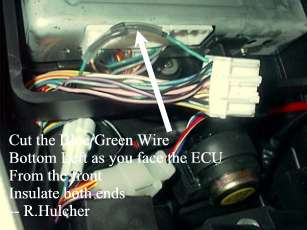
As you face the ECU from the front of the bike, the wire will be the bottom left wire (Blue/Green). Cut this wire, and insulate both ends with shrink tubing or electrical tape. The photo shows connector disconnected for clarity. The connector does not have to be disconnected. The wires are shown under clear shrink – not required, just done to keep the job neat. Re-install the connector (if it was removed. Replace the rubber ECU cover, and replace the riders saddle.
(4) Remove the Exhaust Restrictor:
Remove the lower two (2) springs, then remove the 6mm hex screw holding the 13mm nut. Remove the exhaust canister from the motorcycle. Use caution, make sure it is not hot!
The exhaust restrictor is just inside the pipe opening on the end where the springs connect.
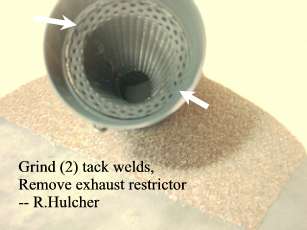
Grind the tack welds off of the mesh, then remove the metal mesh restrictor out of the exhaust pipe.
Re-assemble the pipe on the motorcycle, and install the springs.
END OF PROCEDURE